
If you explore the world of indie makeup at all, you can’t help but come across Blend Bunny Cosmetics. I had wanted to try them for a very long time so when they had a sale, I immediately picked up the All Done Up Eyeshadow Palette. It’s a beautiful color story with interesting neutrals but unfortunately, I have some very unpopular opinions.

The All Done Up Eyeshadow Palette is $36.00 and contains twenty shades; fifteen mattes and five shimmers. It has cardboard packaging with a firm magnetic closure and a mirror. Let’s talk pros and cons!
 Pros:
Pros:
- This palette has such a pretty and interesting color story. It’s not overly colorful but it’s also not totally neutral. The cool toned green and olive green columns are my absolute favorites.
- The layout of this palette makes it very user friendly. You can jump around or go column by column.
- The pastel shades are the most pigmented pastels I’ve ever tried.
- I experienced no fallout from the mattes.
 Cons:
Cons:
- The shimmers, while very sparkly, are so messy. They create a ridiculous amount of glitter fallout and that glitter clings to the face. The shimmers also have more transparent bases and that’s not my preference.
- None of the mattes, except the pastels, blended easily. When this first happened, I assumed it was my fault because Blend Bunny is KNOWN for having easy to blend mattes. However, no matter what base or brush I used, these mattes just did not want to blend. They wanted to stick wherever I initially put them and mattes like that are great for packing on or using as liner but not for blending. I also didn’t feel that the shades blended seamlessly into one another. I’m pleased with the looks I was able to create but all of them were more time consuming because of the mattes.
- Doe Eyed and Goddess are too much alike.
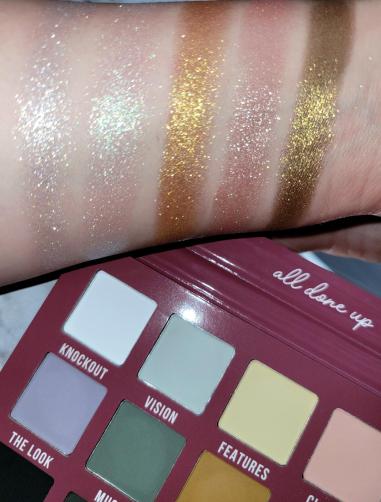
Swatches & Shade Descriptions:
These eyeshadows do have names but no shade descriptions on the website so I will describe them to the best of my ability. When I was doing the swatches, I messed up the order. I am going column by column, left to right across the palette but the columns are reversed on my arm. These photos were taken with flash to show off the sparkle.
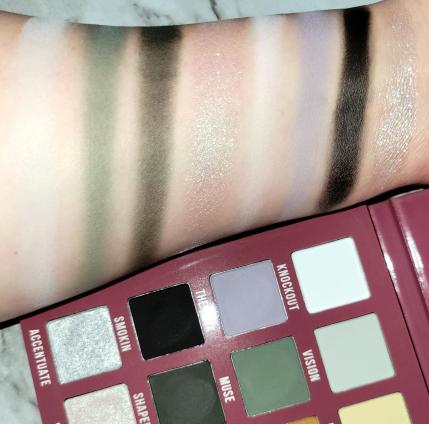
- Vision– matte cool toned pastel green
- Muse– matte cool toned green
- Shapely– matte blackened green
- Shine– transparent white base with green shimmer
- Knockout– matte white
- The Look– matte gray
- Smokin– matte black
- Accentuate– transparent silver base with white shimmer

- Features– matte pastel yellow
- Unexpected– matte mustard yellow
- Doe Eyed– matte brown
- Centerfold– transparent gold base with true gold shimmer

- Natural– matte olive toned cream
- Transform-matte olive brown
- Goddess– matte cool toned brown
- Starlet– bronze base with gold shimmer
- Close Up– matte pastel peach
- Pouty– matte orange toned brown
- Ready– matte deep maroon
- Wink– transparent pink base with white shimmer
Eyeshadow Looks:
I created three looks using this palette. I like them all but each one was a struggle because of the glitter fallout and unblendable mattes. I don’t always wear an eye primer but I do set my base with a cream colored shadow.


- I set my base with Natural.
- I blended Unexpected into my crease.
- I blended Transform into my crease.
- I deepened my crease with Goddess and applied it on my outer lid.
- I applied Starlet in the middle of my lid.
- I applied Centerfold on the inner part of my lid.
- I applied Features on my water line.
- I smudged Doe Eyed on my lower lash line.


- I set my base with Natural.
- I blended The Look into my inner crease.
- I blended Muse into my crease.
- I deepened my crease with Shapely, applied it on my outer lid and smudged it on my lower lash line.
- I applied Shine on my lid.
- I applied Knockout and Accentuate in my inner corner.
- I applied Vision on my water line.
- I smudged Smokin on my lower lash line.


- I set my base with Natural.
- I blended Close Up into my crease.
- I deepened my crease with Pouty and applied it on my outer lid.
- I applied Wink on my lid.
- I smudged Ready on my lower lash line.
Brushes Used:
- Crease Brush
- Detail Crease Brush
- Flat Eyeshadow Brush
- Angled Liner/Brow Brush
- Smudge Brush
- Eye Crease Brush– I use this for inner corner & brow highlights.
- Blending Brush– I use this brush to blend out the edges and set my primer.
If you are curious about any of the other products on my face, you can find these looks in my recent posts on Instagram.
Final Thoughts:
I don’t hate this palette. I want to play around with the pastels more and I can see myself reaching in for one or two of the mattes to pair with some of my single shadows. However, do I see myself using this palette on its own on a regular basis? Absolutely not. I also don’t see myself buying another Blend Bunny palette because there’s too many brands out there that are better and more affordable, in my opinion. Of course, I’d love to know what you think. Thanks for reading and have a great day!

I’ve wanted to try Blend Bunny , but I always hear the Shimmers can be a miss , and that the mattes were better . But still something just keeps me from pulling the trigger on this brand .
LikeLiked by 1 person
I’m definitely in the minority on my opinions about them so you may love them but I just wasn’t impressed. I think the color stories are so beautiful but they just weren’t easy to work with or that special.
LikeLiked by 1 person
I wanted to try the Grunge palette they had , it was like a pastel and grunge color story . But still wasn’t sure about them . I’ve become so much pickier with shadows recently.
LikeLiked by 1 person